Tuesday, December 11, 2012

Embellishing Made Easy

It’s easy to incorporate chalk, metallics, and bling into your artwork with a few embellishments you can use on your everyday papercrafting projects. Let me show you how!
 
 
This Merry & Bright page uses dots created with the gold metallic marker to add extra sparkle around the edges of the page. Notice the scalloped accents with outlines in gold marker which adds dimension and draws your eye. Close To My Heart's metallics markers will make your artwork sparkle! The Metallic Markers come in a 2 pack of medium point silver and gold markers for just $4.95.
Add heart to your art with an extra touch of bling—cover your Dimensional Elements with silver Glitz™ glitter gel, a clear Sparkle or two, or a touch of silver from the metallics marker! Your heartfelt messages will bedazzle your loved ones. A little Glitz goes a long way and comes in 7 colors. The Stardust Glitz is a must to have on hand as it can be added to any card or layout.


The chalk marker and 12" × 12" chalkboard sheet are a perfect pair for creating a unique project. Journal and embellish your memories with the quaint look of a chalkboard—minus the dust—and a lot of freehand fun, perfect to display in your albums or on your walls! Plus, check out those roses. They are made on the cricut from the Art Philosophy cartridge.


If you haven’t had a chance to scrapbook your Halloween photos yet, here’s a great idea for a spooky page. The Haunted assortment with its cute skull brads, spider badge buttons, and more, is the perfect go-to for scary Halloween memories. It also coordinates nicely with the Moonlight paper packet and Moonlight Complements Dimensional Elements. The Moonlight paper and elements are going to be discontinued in January. They are currently available while supplies last. So, if you were thinking about this paper, order it today.
 
 
Tell your story with papers and accents that complement your unique tale. The Memo assortment’s little note tags are great for embellishing and journaling all in one, and the tiny epoxy numbers mimic old typewriter keys. Pair the Memo assortment with our Scholastic paper packet and My Stickease® assortment for your school-themed memories and more!
 
 
This elegant layout is tied together by antique elements from the Baroque assortment, Avonlea Complements canvas shapes, and the beautiful Avonlea papers. Add a timeless quality to your memories with graceful keys, broaches, and buttons from the Baroque assortment.
 
Whatever your project, embellishing will bring your artwork to life. Close To My Heart makes it very easy to add embellishments and help you have fun with your art. Call me today and I can help you find the right embellishment for your project.

Monday, December 10, 2012


Join “Cricut*” Club CTMH today!


Enjoy:

  Ø  An incredible Welcome Package filled with nearly $200 in Brand New and Innovative products!

  Ø  Spending time with fun scrapbooking and paper crafting friends!

  Ø  Discounts on awesome products every day!

  Ø  Sneak peeks and early ordering of new products!

  Ø  Exclusive access the Club CTMH website including bulletin boards with access to thousands of fellow club members; and video, slide and written creative ideas plus lots more!

  Ø  Exclusive Monthly Club Meetings!

  Ø  Exclusive Annual Club Expo featuring hundreds of dollars worth of free products, meals and creative workshops with your fellow club members!

  Ø  Join today for $49, plus receive a ½ price Artiste or Art Philosophy Cricut Bundle!  A $240 value for just $98.50*!


Sign up for Club CTMH today by clicking here.  Click on Let's Get Started. Once you are a Club member (AKA Consultant), you can order the Artiste or Art Philosophy Cricut Bundle at half price through me.
 
Questions? Call me (510-207-2976) or email me (cathryno@gmail.com)  today.
 
*Club Cricut CTMH is only offered through Silicon Valley Stampers Club CTMH until Dec 31, 2012 or while supplies last. Taxes and shipping and handling will be added to the price.


Saturday, December 8, 2012

Gift Bag

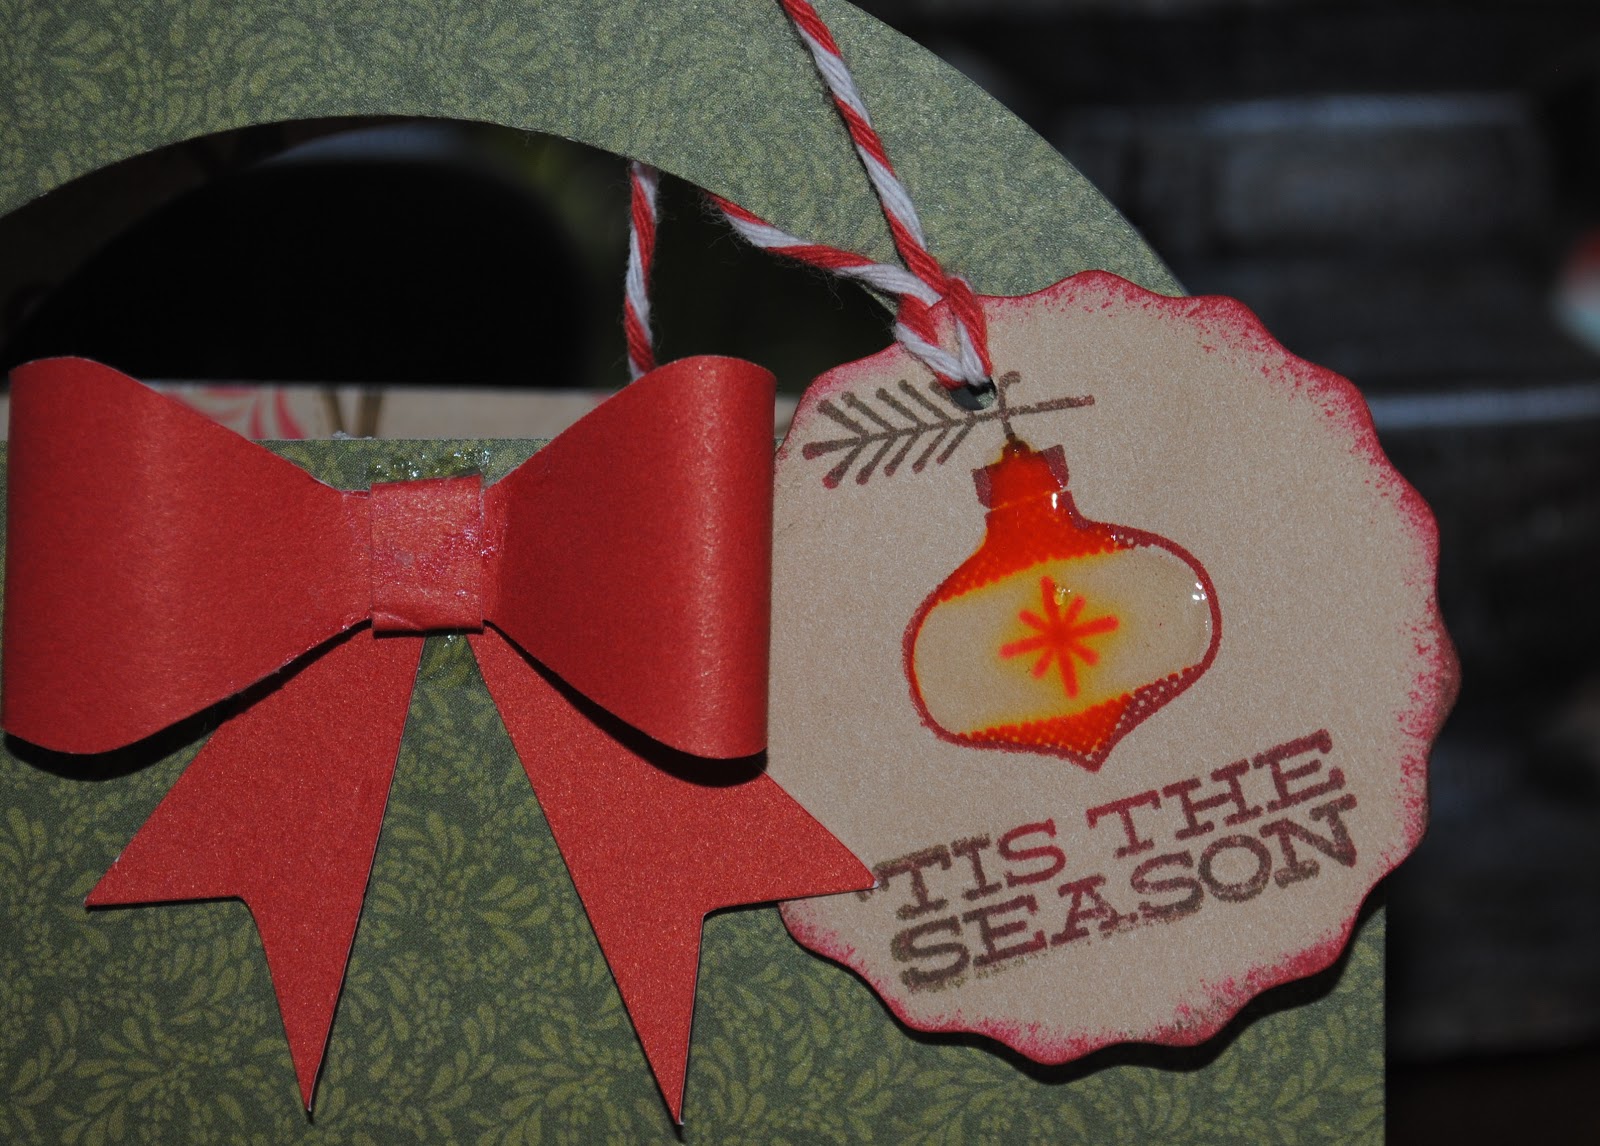
Instead of spending money on gift bags, use the paper you have on hand and your cricut to make your own.


This bag is perfect for gift cards, truffles, jewelry,... what ever you like.

I used the Artiste Cricut cartridge to make it. Here are the instructions:

Pear and Partridge paper- 4 inch 3-D shift <3> (p33- page in the booklet)
Cashmere – 2 inch 3-D shift <2> (p32)
Cranberry- 1 inch accent 2 <g> (p55)
                  1 inch accent 2 shift <g> (p55)
                  1 inch accent 3 shift <g> (p55)

Yes, the bow is paper too! You can do so much with the Cricut!


The tag is stamped with this month's stamp of the month, Year Round Cheer. I inked it with cranberry ink then used a dauber to add some New England Ivy. I used a little liquid glass on the ornament. The tag is tied on with cranberry bakers twine.

Remember to use your Cricut cartridge. You can do so much if you have it out and ready.

Don't have the Artiste yet? Join my team and you can buy the Artiste Cricut Collection for half the usual price! Just click here to join.

Hope you are taking the time to have fun with paper today.

Friday, December 7, 2012

Baby Book

I am very excited -- my nephew and his lovely wife will soon make me a great aunt! As soon as I heard the news, I knew I wanted to make a little baby book for them.


I ended up with a 6x6 chipboard album which I made into a brag book. My niece can just add in her favorite photo of the baby each month.


I didn't want the usual baby blue paper. I decided to go with the Dakota paper pack and a lot of pacifica. One problem I encountered was that the 6x6 album wasn't really 6x6. It was 6 1/4 x 6 3/4 which meant my 12x12 paper was not used very efficiently. I am very happy with the way it turned out. Simple but cute. I'm hoping the new parents love it.

Supplies:
Dakota Paper Pack (x7157B)
Pacifica Paper (X5759)
Pacifica Ink (Z2192)
Token Alphabet stamp set (E1020)
Trinity Alphabet stamp set (E1021)
Blue Ribbon Collection (Z1385)
Urban Felt Alphabet in Pacifica (Z1695)

non-CTMH supplies:
Chipboard album, stickers, washi tape

Thursday, December 6, 2012

Christmas Trees


Look at these lovely trees! I can't take credit for it. These are the creations of Jeanette Lynton. I have taken the directions from her blog.  A quick tip-- use your Cricut. The Artiste and Art Philosophy cartridges both have circles. Set it for 1 inch circles with auto fill and walk away. Don't kill your hand with all those punches.

So- follow these directions from Jeanette and have fun with paper today!

Start by making a 12” and a 10” cone out of topiary cardstock. You may use a protractor or use a long string attached to a pencil. Measure out 12 “on the string and mark it. Hold this mark exactly at one corner of the paper while you draw a line on the bottom curve of the paper with the pencil. Cut on the line and roll the sides together keeping the corner where you held the string at the top. You now have a 12 inch cone. Adhere the sides together lapping only slightly using hot glue (or sew with thread and needle to give it extra reinforcement). Repeat for the smaller tree using a 10 inch string.

To make the small tree punch approximately 64 one-inch circles from Pear cardstock and punch about 60 one-inch circles from the Topiary leaf-print B&T paper taken from the Splendor Level 2 Paper Packet. (Or use any combination of green cardstock and B&T scrap paper that you may have from other projects—your trees will look a little more eclectic, but it’s a fabulous use for scraps!)

For the large tree, punch 84 Pear cardstock one-inch circles and about 75 from the same Topiary leaf B&T paper. Using a White Daisy Exclusive Inks Pad, direct distress one side of each circle. Allow ink to dry for several hours or set ink with a heat gun. Slightly curl each circle by wrapping it around a pencil loosely. Using a hot glue gun or glue dots start at the bottom of each cone with the pear cardstock circles. Overlap them slightly as you go around the entire bottom circle. Alternate the paper for the next row and also overlap each circle slightly as well as lapping over the bottom row slightly. Continue alternating rows until you reach the top. At the top of the large tree add two small bows of Blush gingham ribbon back to back using a glue gun. At the top of the small tree add two Dimensional Elements Stars back to back (using Glue Dots) that have been inked with Topiary ink. On the large tree, for a little extra flair, embellish the “leaves” with pink Sparkles using large ones at the bottom and smaller ones at the top. On the small tree use the green Sparkles to embellish the tree. Put them in the center of your table with fluffy fake snow underneath and enjoy!

Monday, December 3, 2012

December Stamp of the Month


Time to have a lot of fun with the new stamp of the month.
 
It's a year of stamping! I love how Close To My Heart used twilight paper and the flirty paper pack to make 12 3x3 cards. Quick set and ready to send out once a month. Great use of this stamp set.
 
This stamp set is available only in the month of December. You can get it for just $5 with a $50 order. Click here to order or to get the recipes for the above projects.

Have fun with paper today!

Thursday, November 29, 2012

The Right Tools Make the Difference


Note that the velvet rub ons mentioned as available only while supplies last. If you are interested click on shop box right away.